Frame Fitting Fundamentals: Pupillary Distance, Bridge Fit & Alignment
Learn how to measure pupillary distance accurately, fit frame bridges for comfort, and align frames properly for optimal vision and patient satisfaction.
Quick Definition
Proper frame fitting aligns the optical center of eyeglass lenses with the wearer's pupil by measuring pupillary distance (PD), assessing bridge fit for comfort and stability, and ensuring correct frame alignment to the face. These three elements work together to deliver optimal vision, comfort, and correct optics.
Why Frame Fitting Matters
A well-fitted frame is not just about comfort—it directly affects the quality of the patient's vision. When the optical centers of the lenses do not align with the patient's pupils, unwanted prism is induced, which causes eye strain, headaches, blurred vision, and difficulty with near work. Additionally, a poorly fitting frame may slip continuously, dig into the nose, or feel unstable, leading to patient dissatisfaction even if the prescription is correct.
As an optician, your ability to measure accurately, select the right frame, and adjust for fit is as critical to patient success as the lens prescription itself. This guide covers the three pillars of proper frame fitting: pupillary distance measurement, bridge fit assessment, and frame alignment.
Understanding Pupillary Distance
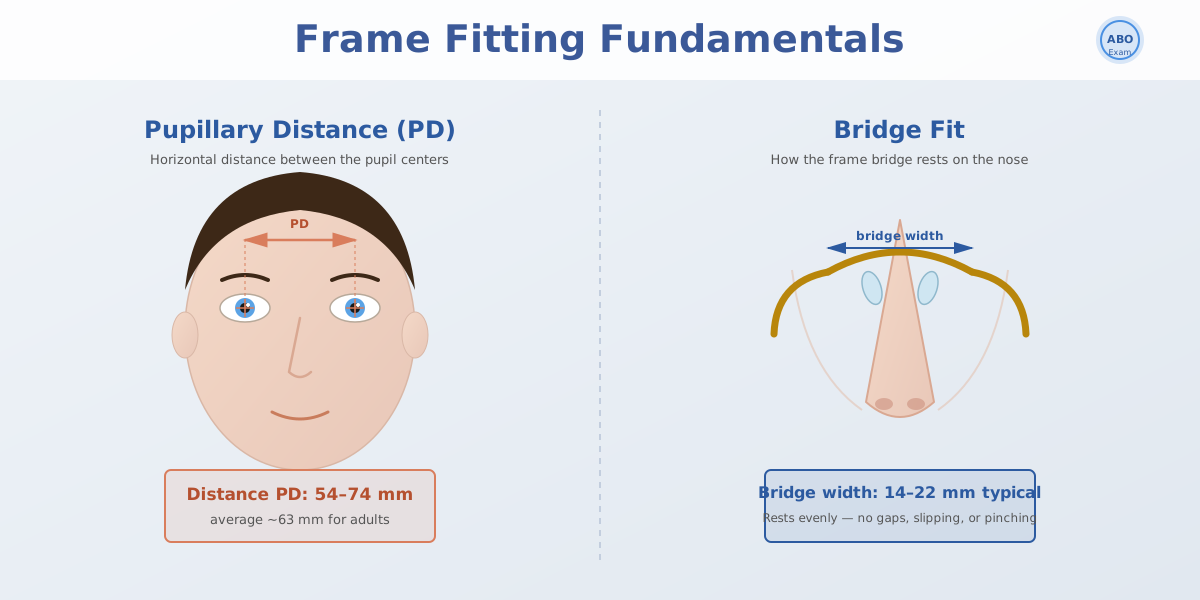
Pupillary distance (PD) is the horizontal distance between the centers of the pupils, measured in millimeters. Accurate PD measurement is essential because the optical center of each lens must align with the wearer's pupil to deliver the full benefit of the prescription.
Opticians work with a few related PD measurements:
- Distance PD:The distance between the pupils when the patient fixates on a distant target (20 feet or more). Distance PD is used for distance-vision prescriptions and the distance portion of multifocals, and is typically 54–74 mm for adults (average ~63 mm).
- Near PD:The distance between the pupils when the eyes converge on a near target at the patient's actual reading distance. Near PD is about 3–4 mm smaller than distance PD, and is used for single-vision reading/near prescriptions and for calculating segment heights and insets on multifocals.
- Monocular PD:The distance from the center of the bridge of the nose to the center of each pupil, measured separately (typically 27–37 mm per eye). Recording monocular PD provides more precision when ordering lenses and is especially important for higher prescriptions and bifocal/progressive lenses.
The average adult distance PD is approximately 63 mm, but individual variation is significant. Children typically have smaller PDs (48–56 mm), and some adults may fall well outside the average. Never assume a PD value; always measure each patient.
How to Measure Pupillary Distance Accurately
Accurate PD measurement requires the right technique, the right tools, and attention to detail. Follow these steps:
Step 1: Position the Patient
Sit or stand directly facing the patient at arm's length (approximately 40 cm / 16 inches), with your eyes level with theirs. To capture true distance PD, the patient must fixate on a distant target 20 feet or more away—not on your eyes or nose, since converging on a near object produces the smaller near PD instead. Keep the patient in a natural, relaxed position, and ensure good lighting so you can see the pupils clearly.
Step 2: Choose Your Measurement Tool
Use a standard ruler, a dedicated PD ruler (which has a small window or mirror for sighting), or an automated PD measurement device. A PD ruler is preferred because it allows you to align your eye with the patient's pupil line while measuring, which reduces parallax error.
Step 3: Measure Distance PD
Rest the ruler horizontally on the bridge of the patient's nose. Close your own right eye and, viewing with your left eye, align the ruler's "0" mark with the center of the patient's right pupil. Then—without moving the ruler—close your left eye, open your right eye, and read the millimeter mark that falls over the center of the patient's left pupil. This alternate-eye (fixation-switch) technique cancels the parallax and convergence error that would otherwise distort the reading. The patient continues fixating on the distant target throughout. Record to the nearest 0.5 mm.
Step 4: Measure Monocular PD
Measure from the center of the bridge of the nose to the center of each pupil separately, keeping the patient fixated on the distant target. Use the same alternate-eye technique: close your right eye to align the ruler's zero at the center of the nose bridge, then read each pupil's position with the appropriate eye. Do not occlude the eye you are measuring—that eye must stay open and fixating, or the pupil position (and therefore the reading) becomes invalid. This gives you left and right monocular values, which together should equal the distance PD (allowing for ±0.5 mm rounding).
Step 5: Take Multiple Measurements
Measure at least twice to ensure accuracy. If the measurements differ by more than 0.5 mm, repeat until you are confident. Record both the distance and monocular PD values in the patient's file.
Tip: If the patient wears glasses, have them remove them during PD measurement to avoid parallax error. Do not measure through the existing lenses.
Bridge Fit Assessment
The bridge of the frame is the part that sits on the nose. Bridge fit directly affects comfort, stability, and how long a patient will comfortably wear their glasses. An ill-fitting bridge can cause pressure marks, slippage, and even return the glasses.
Bridge width is measured in millimeters and typically ranges from 10 to 22 mm. Common sizes are 14, 16, 18, and 20 mm. The correct bridge size depends on the patient's nose width and shape. To select the right frame bridge:
Signs of Correct Bridge Fit
- • Frame sits evenly on the nose without pressure marks
- • No gap between the bridge and the nose
- • Frame does not slip forward or backward
- • Patient reports no pinching or soreness
- • Frame is stable during eye movement
Signs of Poor Bridge Fit
- • Frame slides down the nose repeatedly
- • Bridge pinches the nose, causing marks or pain
- • Gap visible between bridge and nose
- • Frame tilts to one side (asymmetric)
- • Patient must constantly adjust the glasses
If the bridge is too wide, the frame may slip constantly and miss proper pupillary alignment. If the bridge is too narrow, it may dig into the nose, causing discomfort and pressure marks. Bridge shape also matters: some noses are flat (requiring a bridge with less contour), while others are more pointed (requiring a bridge with more support). Always allow time for the patient to try the frame on and confirm comfort before ordering.
Frame Alignment and Positioning
Beyond PD and bridge fit, the alignment of the frame on the face is critical to optical performance. Even if the PD and bridge are correct, improper frame position introduces unwanted optical effects.
Pantoscopic Tilt
Pantoscopic tilt is the forward angle of the frame (tilted down at the bottom). Most frames are designed with 8–12 degrees of pantoscopic tilt. This tilt positions the lens so its optical center passes through the eye's center of rotation, which minimizes off-axis astigmatism and unwanted prism; as a rule of thumb, the optical center should be lowered roughly 1 mm for every 2 degrees of tilt. Without proper tilt, higher-power prescriptions and progressive lenses may cause discomfort or visual distortion.
Face Form and Frame Wrap
Face form refers to the angle at which the frame arms wrap around the face. Some frames wrap significantly (sport frames), while others sit more perpendicular to the face (traditional designs). A frame with too much wrap or too little wrap can misalign the optical centers and cause unwanted prism as the patient looks to the sides.
Vertex Distance
Vertex distance is the space between the back of the lens and the front of the cornea, typically 12–14 mm. Frame size and fit directly affect vertex distance. A frame that sits too close or too far from the eye changes the effective power of the prescription, especially in higher powers. Ensure the frame is positioned at an appropriate distance from the face.
Height Alignment
The horizontal line through the optical centers should align with the pupil when the patient is in a normal reading or gazing position. For progressive lenses, the frame height and position are especially important to ensure the patient can access all three zones (distance, intermediate, near) properly. A frame positioned too high or too low will misalign the zones.
Common Frame Fitting Problems and Solutions
Problem: Frame Slides Down the Nose
The frame is too wide in the bridge or the arm angle is too far back.
Solution: Select a frame with a smaller bridge size or adjust the arm angle forward by carefully bending the arms at the hinge. If the patient is very sensitive to slippage, nose pads or frame straps may help.
Problem: Bridge Pressure or Marks on the Nose
The bridge is too narrow or the bridge material is too rigid.
Solution: Try a frame with a larger bridge size or softer bridge padding. Ensure the patient is wearing the frame at the correct distance from the face. If the bridge is metal, it can sometimes be carefully widened, but this is a temporary fix; a different frame is usually the better choice.
Problem: Patient Complains of Blurred or Distorted Vision
The frame is not aligned correctly, or the optical centers do not match the pupillary distance.
Solution: Verify the PD measurement and confirm it was correctly entered on the lens order. Ensure the frame is positioned at the proper vertex distance and pantoscopic tilt. For progressive lenses, check that the frame is not too high or too low. If the problem persists, remeasure the patient's PD and consider a different frame size or shape.
Problem: Asymmetric Frame Fit (Frame Tilts to One Side)
The nose is asymmetric, or the bridge is not centered.
Solution: Adjust the arm temples slightly by carefully bending the arm or the nosepads to account for the patient's face shape. Some frames with adjustable nose pads are easier to customize. Ensure both sides of the frame are sitting evenly on the patient's ears to help stabilize fit.
Key Calculations and Tools
Accurate frame fitting also involves understanding how changes in frame dimensions affect optics. If you are working with higher prescriptions, understanding how lens cutout (lens aperture) relates to frame size can help you select frames that accommodate the full prescription without excessive thickness or edge distortion.
For complex fittings—such as those requiring specialized pantoscopic tilt adjustments, face form compensation, or high-power prescriptions—refer to the ABO study guide and related technical resources to deepen your understanding of how frame parameters interact with lens optics.
Master Frame Fitting for the ABO Exam
Frame fitting is a core competency tested on the ABO exam. Practice measuring PD, assessing bridge fit, and solving alignment problems to build confidence and expertise.
Study Frame Fitting for ABOFrequently Asked Questions
What is the average pupillary distance for adults?
The average adult distance (binocular) PD is approximately 63 mm, typically ranging from 54 to 74 mm—roughly 27–37 mm per eye (monocular PD). PD varies by individual and ethnicity, so always measure each patient's PD rather than assuming an average value.
Why is pupillary distance important when fitting glasses?
An accurate PD ensures the optical center of each lens aligns with the wearer's pupil. Misalignment causes unwanted prism, which can lead to eye strain, headaches, blurred vision, and discomfort. Precise PD measurement is essential for patient satisfaction.
How do you measure pupillary distance correctly?
Position yourself at arm's length (about 40 cm) from the patient, with your eyes level with theirs and the patient fixating on a distant target 20 feet or more away. Rest a PD ruler on the bridge of the nose, then use the alternate-eye technique: close your right eye and align the ruler's zero with the patient's right pupil, then close your left eye and read the mark over the left pupil. This cancels parallax and convergence error and yields true distance PD. Record both monocular and distance PD to the nearest 0.5 mm.
How do you fix a frame that is too tight or too loose across the bridge?
A frame that is too tight on the bridge can be widened carefully by gently spreading the bridge upward or by replacing with a frame that has a larger bridge size. A frame that is too loose may slip and cause discomfort; it can be tightened slightly by carefully pressing the bridge together or by selecting a frame with a smaller bridge measurement.
What is pantoscopic tilt and why does it matter in frame fitting?
Pantoscopic tilt is the forward angle of the frame, tilted down at the bottom (typically 8–12 degrees). Correct tilt positions the lens so its optical center passes through the eye's center of rotation—lowering the optical center about 1 mm for every 2 degrees of tilt—which minimizes off-axis astigmatism and unwanted prism. Proper pantoscopic tilt improves visual comfort and optical performance.